There are essentially two ways of doing this, the Easy Way and the Not So Easy Way but before that . . .
Safety First. DO NOT FLY kites, balloons or anything else with a tethering string, such as this, near to any
overhead power cables. To be safe, make sure that the length of line is FAR SHORTER than the distance to the nearest power cable in any direction. This type of buoyant device is best flown in still air
which can have slight, short-lived or even prolonged gusts in ANY DIRECTION so BE SAFE. I have found it best to fly away from trees, houses and other structures that the cord can snag
against.
The Easy Way is 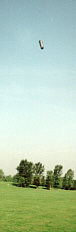 to
to 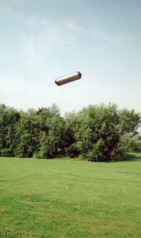 purchase the Solar Powered Zeppelin
from
AstroMedia. These are not expensive, they are quick and easy to put together, all of the maths is done, all of the materials are sourced and packaged for you in the correct amounts from one supplier, they only cost a few Euros, you can order them over the Internet and all you have to do is to follow the instructions. No sticking or cutting - if you can tie knots in string, you can make this.
purchase the Solar Powered Zeppelin
from
AstroMedia. These are not expensive, they are quick and easy to put together, all of the maths is done, all of the materials are sourced and packaged for you in the correct amounts from one supplier, they only cost a few Euros, you can order them over the Internet and all you have to do is to follow the instructions. No sticking or cutting - if you can tie knots in string, you can make this.
I would recommend that you start with one of these (as I did) so as to get the hang of what is going on - how to handle it, wind conditions and so on. These are quite impressive and you occasionally hear people expressing
astonishment. On the left, you can see one about 40 metres up in the air and on the right, one fairly close to the ground. They are around 2.5 metres or so long and you can see the shadow on the ground on the right (it is
quite close to the trees). They move quite slowly and people generally don't notice them until you draw attention to them (try pointing into the air and people will look where you are pointing. Just for a joke, try
standing still in a street, with a friend and point at some part of the sky - you will soon find that others will stop and try to see what you appear to be looking at and very occassionally, someone else will point and if
you are really lucky, you may even get someone to claim to someone else that they can see something). These balloons will go very high and on one occassion we even had birds circling it.
 The
Not So Easy But More Creative Way is this . . .
The
Not So Easy But More Creative Way is this . . .
This is for a very simple cylinder (right) made from bin liners from a supermarket. It has the advantage that you can make it any shape or size you want within the laws of physics (as we know them ;-). Make it like the
animation on the right or make it slightly flatter and more like a UFO. All you need to do is unroll, cut and tape. This page shows you how.
You need:
- A set of scales that can weigh from a few grammes to around 600 grammes (this bit stays in your kitchen :-);
- A role of Thin Black Plastic Bin Liners (you know, the sort that you put rubbish in and the plastic is so thin that it falls straight through the bottom - remember that all you want to do is hold hot air);
- A new role of Sticky Tape or narrow double sided tape (Sellotape or similar is good enough, again, you are holding plastic bags together to stop air escaping so you don't need anything heavy duty); and,
- Cord (ideally, around 500 feet of kite flying cord is best. Don't use fishing line monofilament as this will snag. Don't go any longer than the kite flying regulations will allow for where in
the world you are. Choose the lightest and strongest cord you can get hold of, remember that you need to be able to control it).
If you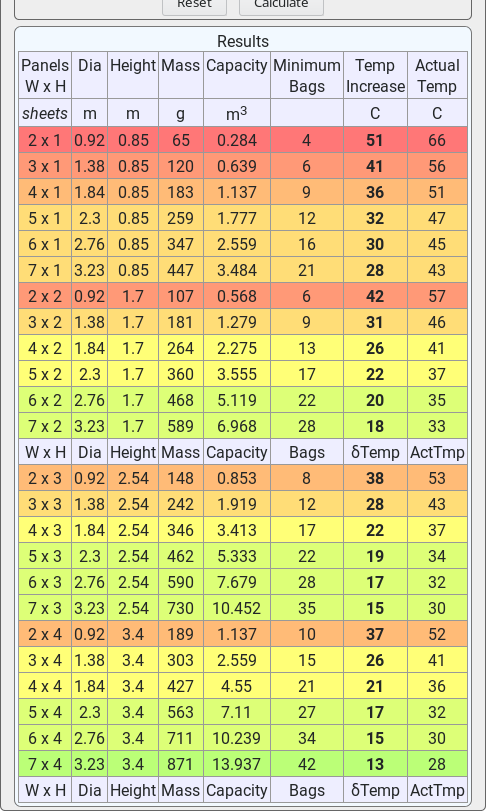 can get
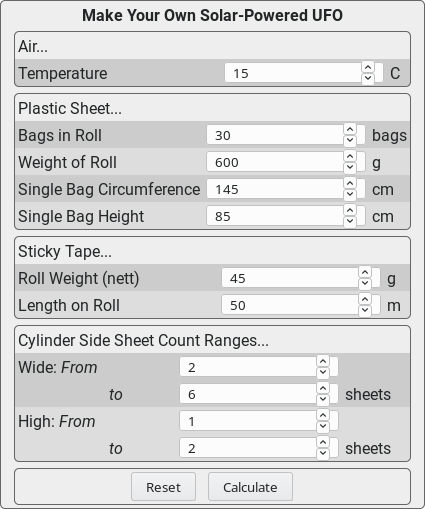
that lot together then you can start to calculate how you should build one. To help, I have written a cgi form that you can input the data to and it will do all of the hard
work for you (calculating which variants are more likely to fly than others). This is what you do . . .
can get
that lot together then you can start to calculate how you should build one. To help, I have written a cgi form that you can input the data to and it will do all of the hard
work for you (calculating which variants are more likely to fly than others). This is what you do . . .
- The air temperature was around 15C. Raising one cubic metre of it by one Celius will provide roughly 4.4 grammes of lift at around this temperature.
- Weigh the role of Bin Liners (I got 600g). Knowing the number of liners (mine had 30 on it) lets you calculate the weight of one.
- Take one of the liners off the role and cut across the bottom to make an open-ended tube. Measure the height (from open end edge to open end edge, I got 85cm)
and the circumference (twice the width, I got 145cm). This will give you the area and allow you to calculate the unit weight of the plastic (grammes per square metre).
- Weigh a complete roll of sticky tape (ignore or guess the core weight as the useage and the errors elsewhere will make it irrelevent unless it is made from cast iron, I got 50g so I used 45g). Being a complete roll, you should know its length (mine was 50m) so now you can calculate its unit weight (grammes per metre).
- Finally, input the ranges of the number of bags that the side of the ufo is going to have - it will work them out and show you the temperature rise that you will need for it to become neutrally buoyant for each width/height count.
- Wide. If you use your bin liner tube without slitting it up the side, you will not have to tape up the side (the model takes this into account by having one less length of tape in that case) but if you
do slit the liner up the side, you can stick 2, 3 or more, side by side to make a larger diameter cylinder (less surface area for a given volume). This is the number in the "Wide" row.
- High. If you tape the open ended bin liner cylinders end to end, you can increase the enclosed volume. This number is put into the "High" row.
This is all about enclosing the largest volume with the smallest surface area so the more "spherical" the shape, the better it will perform, ie. the smaller the required temperature
difference for a given lift. The model will give you the results for a number of different configurations and you can choose the one you want to make.
Of course, there is nothing to stop you from making the shape a little more like a flattened truncated cone or from putting partially transparent sections on it (using white swing bin liners) or using different
coloured bin liner pieces to make colourful characters or emblems as long at it remains tethered securely.
Some things to consider are:
- The temperature rise you can expect can be measured by comparing the air temperature in the shade with that of some air in one of the bin liners with the sun shining on it. Depending upon where in the world you are, you can get a 10, 20, 30 or more Celcius increase. It is best to know what your weather is capable of.
- Tape will stick to the other (in)side if you don't make sure that the joints in the plastic sheet are edge to edge;
- You should make sure that your tether string is secure as it will just float away if it breaks free (remember it will have your finger prints and DNA all over it so there is no denying things
if it ends up causing an accident - it doesn't have to be sucked into an aeroplane engine to cause an accident, remember that what goes up eventually comes down and if it goes across a
road, it could cause a serious road accident so be careful);
- A colder outside will give a better lift for a given temperature rise (greater density);
- The amount (length) of string that a given balloon will lift will be limited by the density of the air where the balloon is (ie, higher up, there is less lift) as well as more weight of string;
- The higher the temperature, the lower the intial density;
- The higher up you are to start with (mountain regions) the lower the air density and therefore the lower the lift (you can find data like this in physics books);
- The larger balloons will take longer to warm up;
- The skin of the balloon will allow heat to flow out of it by conduction (you can see a heat haze around the outside of the balloon; and,
- The Minimum Number of Bags is calculated from the bags used in the side and the area required to cover the ends. It may well take one or two more bags.
Have Fun
All you have to do now is click on the calculate button. If you want to reset the form, just click on reset and all of the values will be reset to what they were for your previous calculation.
Now you have read through all of this and have absorbed the safety instructions at the top of this page,
Click here to load the calculator form.